Introduction
In order to test PI processing for a scenario using a SAP B2B Splitter we need to connect two types of IFTT test cases (of type PI GUID E2E Inbound and PI E2E Outbound). We cannot use the standard PI Unit Test type, because the scenario consists of two separate ICOs (described below in parts A and B).
The first ICO receives a collective message from the EDI partner and sends it to the EDISeparator adapter. In this case, the validation in Int4 IFTT would only show the incoming message being forwarded. The second ICO, on the other hand, receives the collective message also via the EDISeparator channel, but here the message is being splitted and filtered by type to single messages, e.g. EDI sales order. This message is already mapped to the final SAP form, e.g. IDOC.
Example case
Example scenario in which we want to test the EDI Splitter is presented in the scheme below:
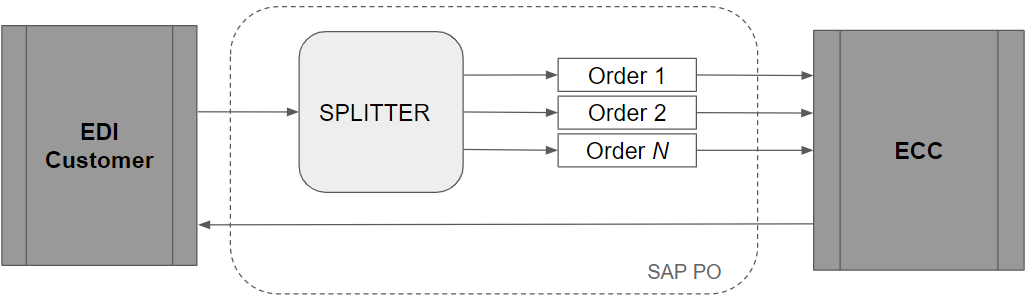
This article describes the part of the presented above flow related to the EDI Splitter, ie. verify the operation both before the Separator (part between “EDI Customer” and “Splitter”) and after the Separator (part between “Splitter” and ECC system). Testing the rest of the flow is described in the article Outbound Flat File scenario with 'PI Outbound' interface testing.
Procedure
Part A. PI Inbound Testing
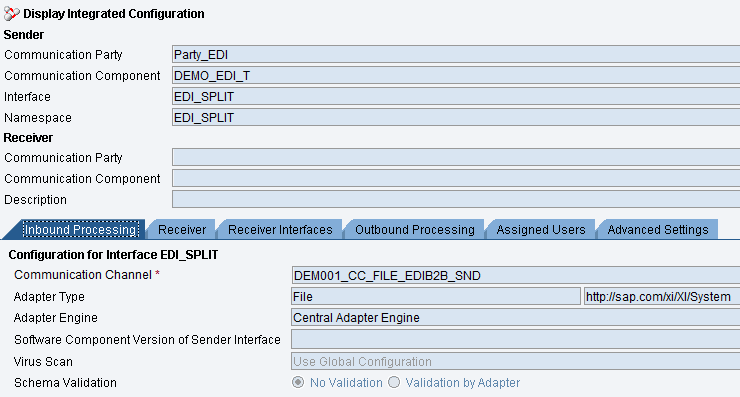
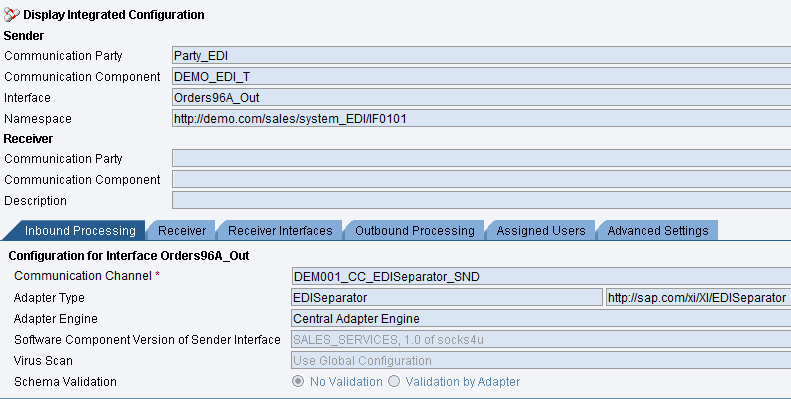
Testing the scenario described above requires virtualization of an EDI Partner and uploading a collective message to the SAP PO and the first test case (of type PI GUID E2E Inbound) is used for this purpose. In this step we will test ICO with “File” as Adapter Type in Inbound Processing:
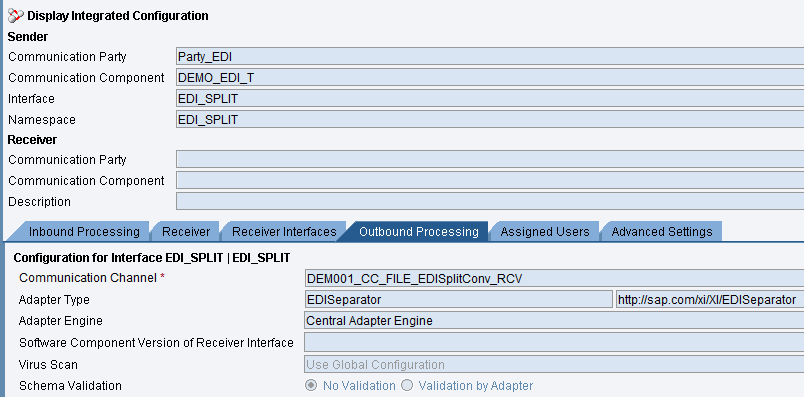
And “EDI Separator” as Adapter Type in Outbound Processing:
A. Automation Object creation.
Go to transaction /INT4/IFTT_CONF and create new object definition, e.g. providing following data:

IFTT Automation Object and Description can have any name, but in the Name and Namespace fields we should provide the interface name and namespace used in the ICO of the tested interface.
For more info on how to fill this section check Automation Object Definition.
2. Go to Variables and define Variable name and Variable description. Unlimited number of variables can be declared.
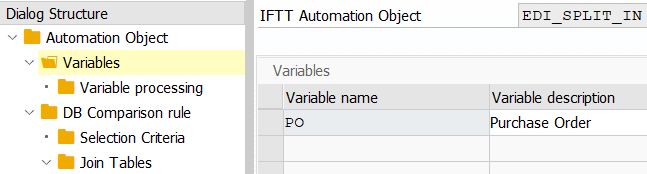
For more info on how to fill this section check Variables.
3. After selecting a single variable move to Variable Processing tab. Here you define actions for every variable declared in the previous step. For more specific information check Variable processing section. Be aware that for constructing XPath Expressions for flat files Expression language for flat files should be used.

4. Due to the fact, that the tested interface uses a flat file, in Additional Parameters tab you should set parameters for flat file interfaces and line separator as follows:
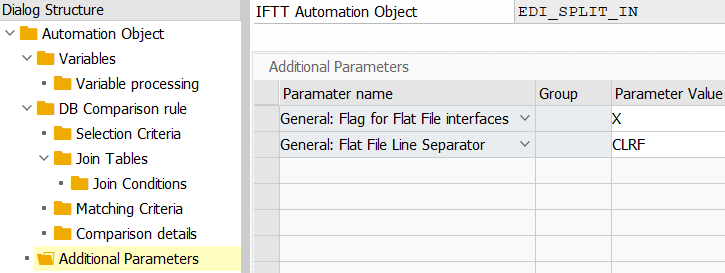
For more info on how to fill this section, please check Additional Parameters.
5. Optionally create a number range that can be assigned to specific variable or multiple variables in variable processing section (in this example the name of the defined number range is $1), so that we can overwrite the original numbers with the new test values. Please note that this is only needed if we do not want to send duplicates from original documents (e.g. sales orders to final customer).

For more info on how to fill this section check Number ranges.
A. Test Case creation.
After creating and defining Automation Object, create and save the IFTT test case (provide Test case description, Interface Type as PI GUID E2E Inbound, Automation Object created above and choose reference message for tested interface):

Part B. PI Outbound Testing
In the second part we will create test cases of type PI E2E Outbound in connection with the test case from part A. Their role is to find the appropriate single messages created from collective messages and then compare their values after mapping with a previously prepared pattern. This search is done by analyzing the content and matching, for example, order numbers from a collective message with final single results. For this purpose test cases are connected to each other (using test case property “Parent ID”). Their automation objects have also defined variables that take the value from the previous case, so that they can be linked together (in this example it is variable named “PO”, details on how to make this connection are described in point 2 below (Variables subsection)).
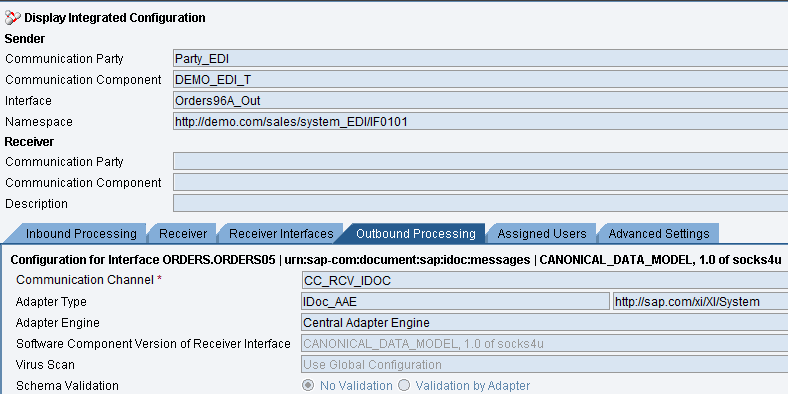
In this step we will test ICO with “EDISeparator” as Adapter Type in Inbound Processing:
And “Idoc_AAE” as Adapter Type in Outbound Processing:
B. Automation Object creation.
Create an Automation Object in the same way as before, but remember to choose proper Service Interface Name and Service Interface Namespace from tested ICO.

2. Define Variables:
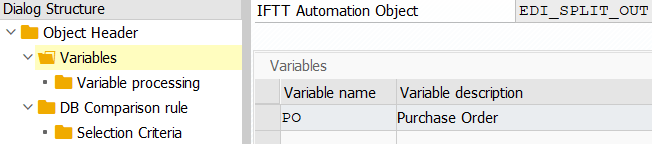
Define also Variable processing. Please note that the PO number is being read from the parent test case. And in case of a one-to-many relationship between “parent” and “child” test cases (as it is in this example) we should use variable processor named “READ_PREVX” together with the Action “Populate variable before execution” and proper Processing Parameter value. The combination of these parameters (first record on the screenshot below) is used to filter the comparison between the new messages with their respective reference messages (filtering is done using values taken from message based on the path entered in the field Processing Parameter). In this example we compare IDOCs, so we define xpath to the segment which contains the purchase order number: //E1EDK01/BELNR/text().

3. Optionally we can define Payload Validation Ignore List, i.e. fields that should not be compared during verification between reference and current message. As an example, a difference in the generated document number or the date can be used here. For more info on how to use this section check Payload Validation Ignore List.
B. Test Case creation.
After creating and defining Automation Object, create and save the IFTT test case (provide Test case description, Interface Type as PI E2E Outbound, Automation Object created above and select reference messages for mentioned Interface). To make sure that we get the right messages while crating “child” test cases, we can select the parent test case and click the “Content” button to see the input message as shown below:
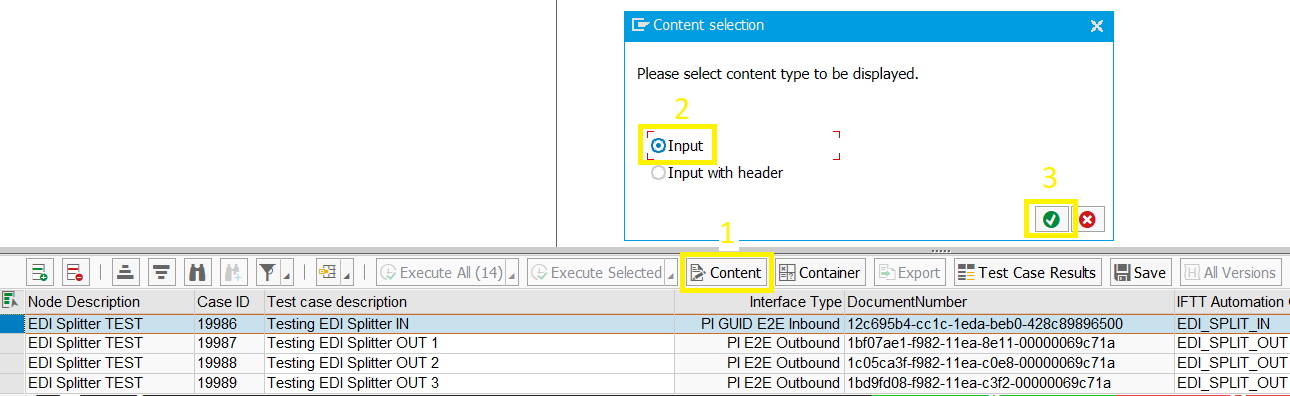
There we can see the input for the test case:
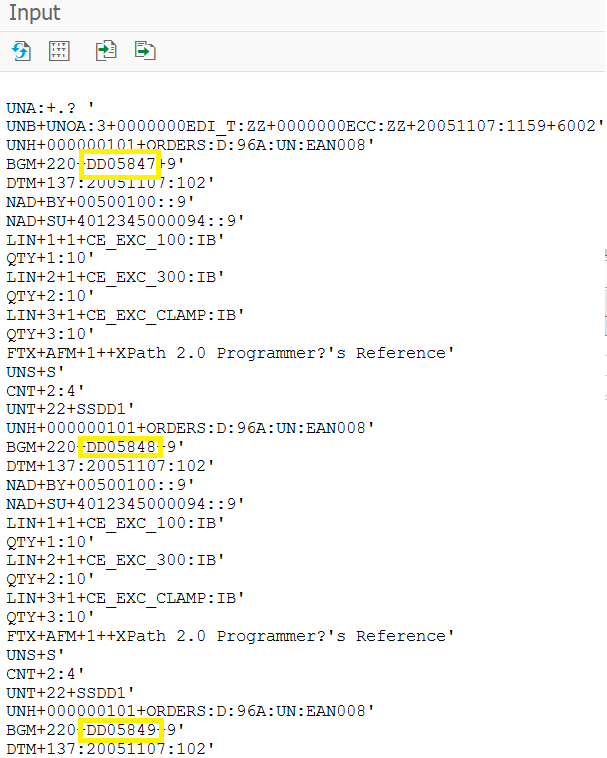
And we can notice that for the “child” test case’s we should select using the IFTT message selector three messages containing purchase order numbers marked on the screenshot above (in this example: DD05847, DD05848 and DD05849) .
Please remember to choose the number of the previous test case as Parent ID before saving “child” test cases:

Part C. Execution of Test Cases
Select all created test cases (from Part A and B) and click “Execute Selected” button:

2. After processing the test cases, you will receive a Test Case Execution Result Report:
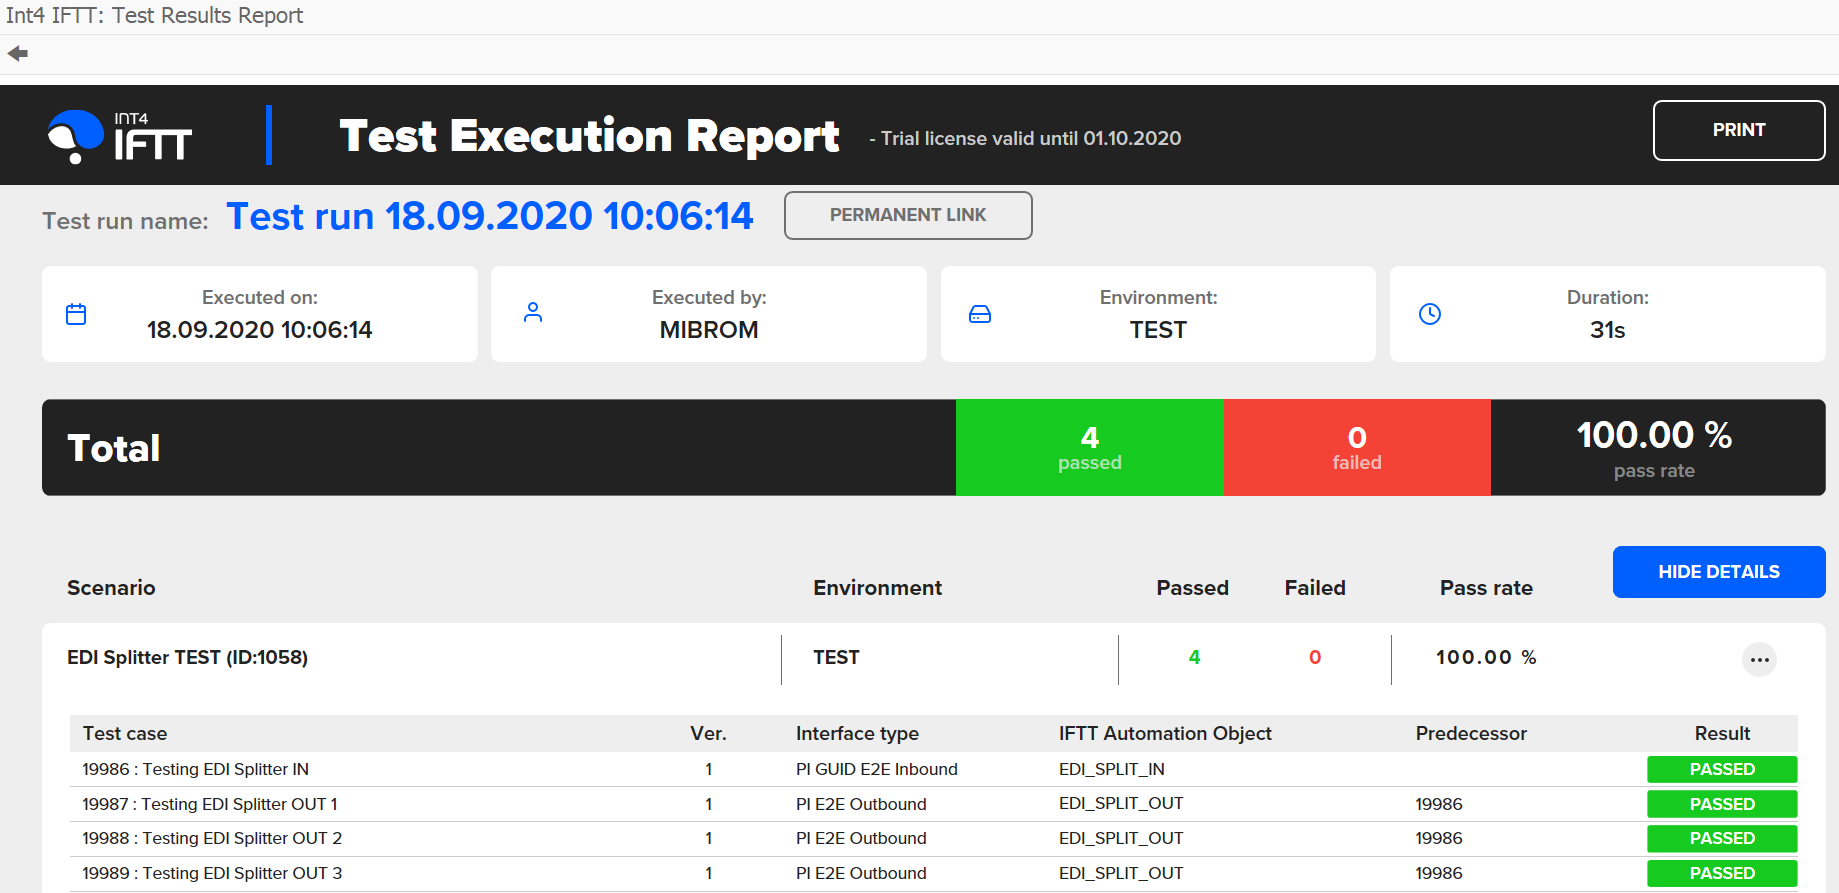
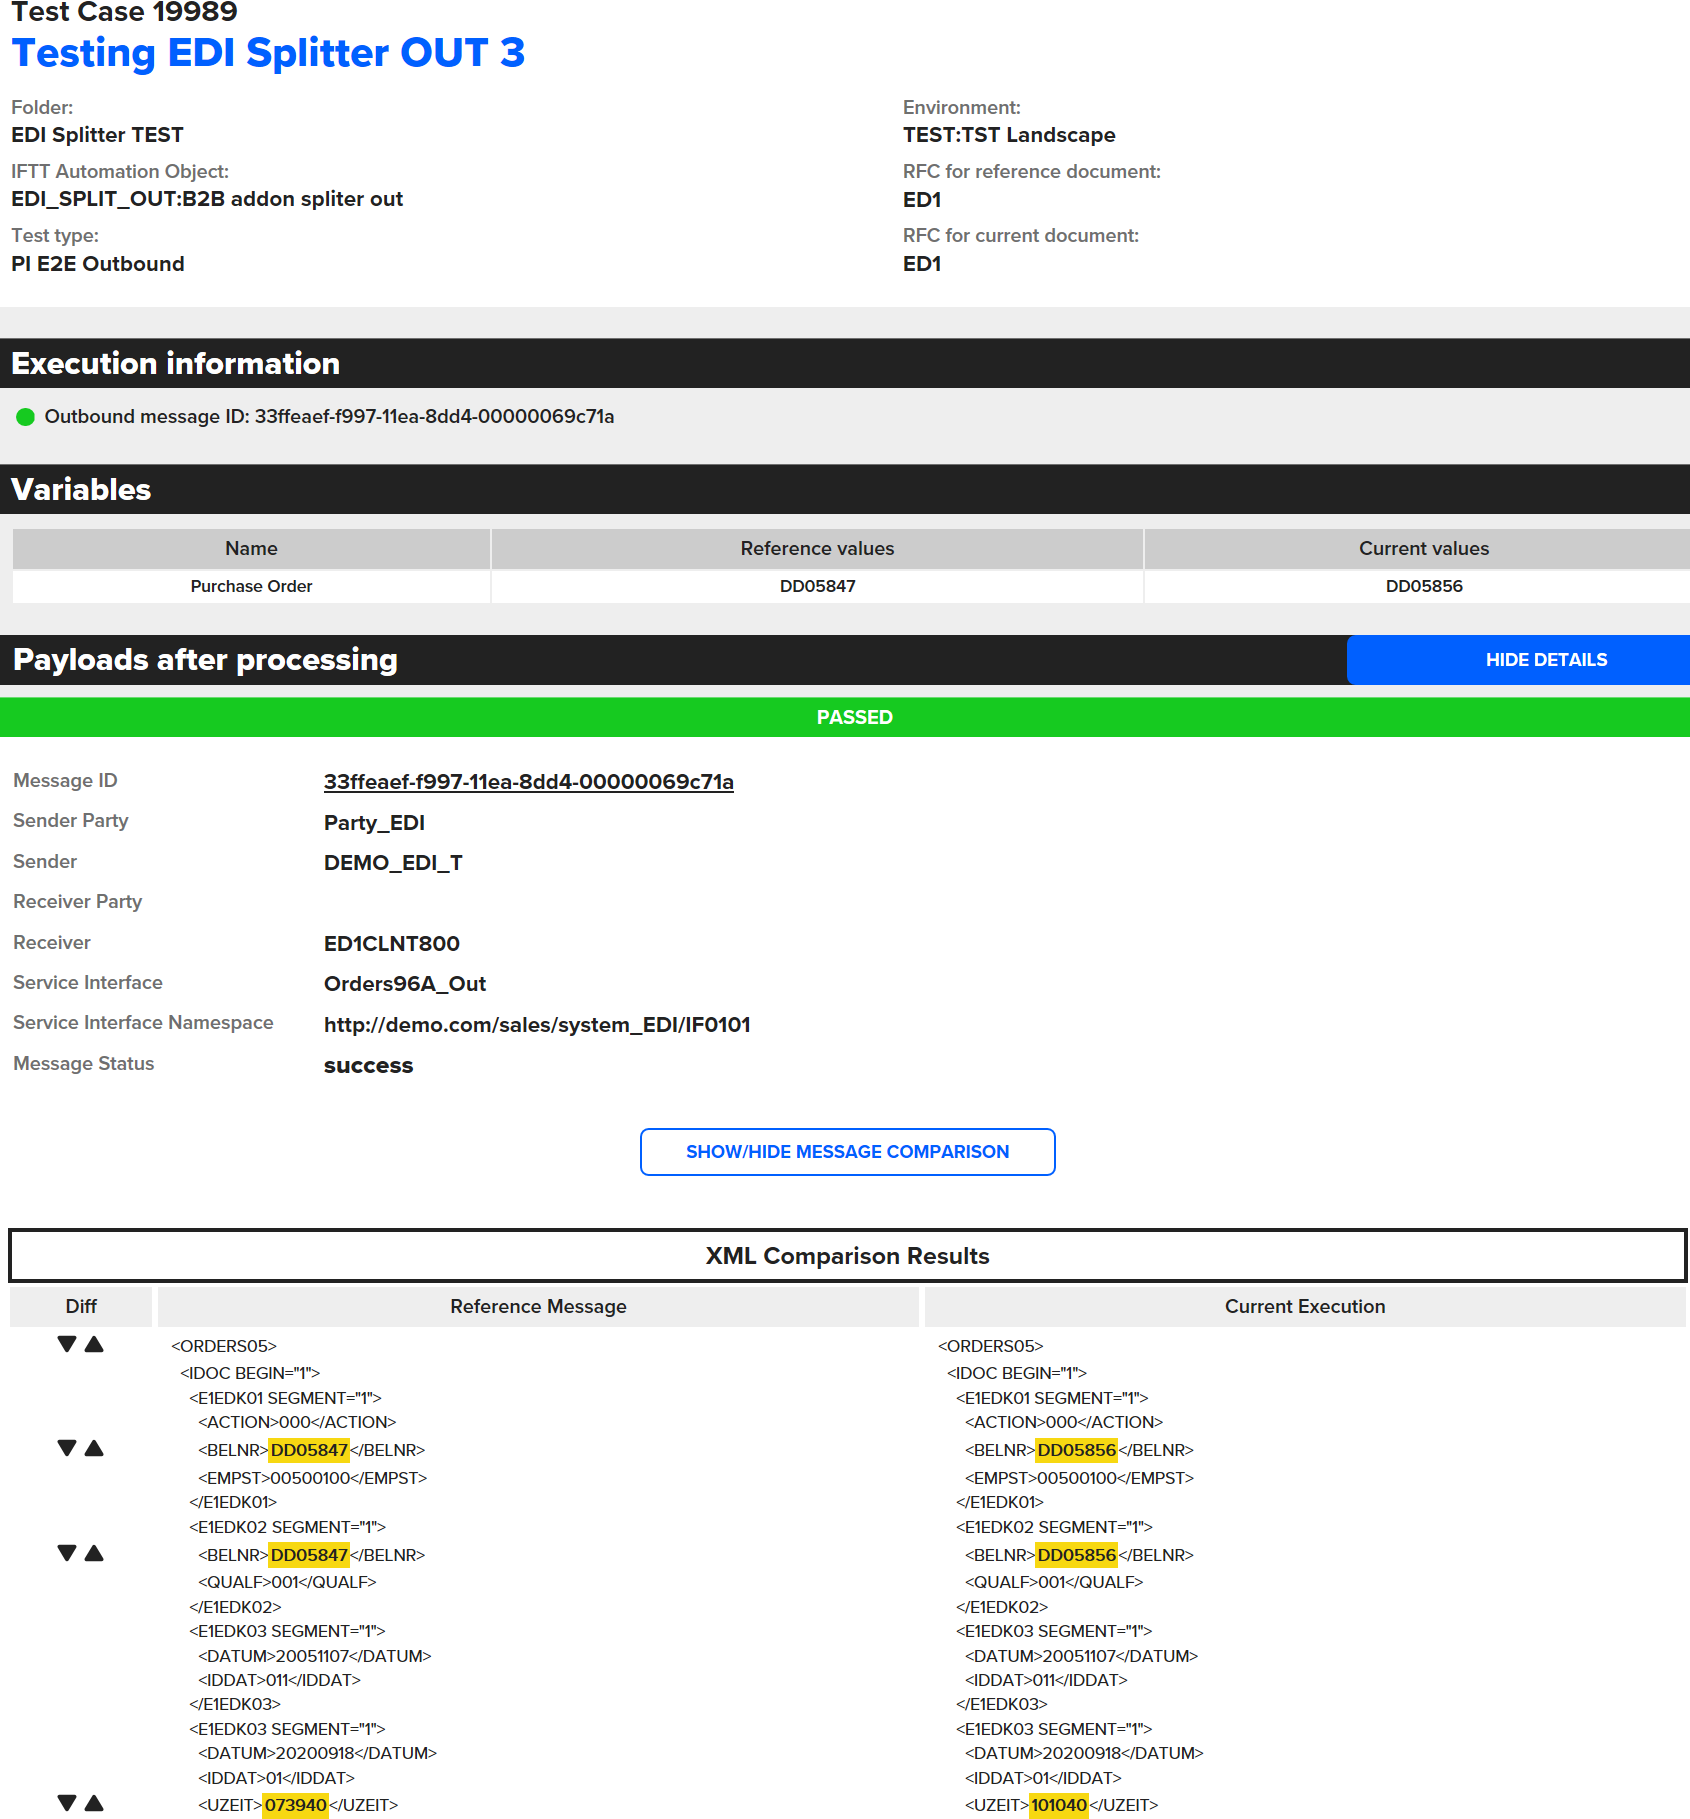
For details of each test case, click on the given test case (below is a report for test case where the reference PO reference value is DD05847).